This form is broken down in to sections, to make finding your way around it easier.
Although complicated looking, it is relatively straightforward to make up a mailshot, and see the results before committing anything to labels or letters.
Overview
The first thing to think about is who you’d like on the mailshot.
You don’t have to worry about possibly selecting one customer several times, if they qualify in more than one section, the system won’t create duplicate labels.
A simple mailshot will involve setting what you need, making the mailshot, then making the address labels file. More complicated ones will involve starting with make new mailshot, using the add to mailshot button and setting several different sets of parameters, adding them to the mailshot each time, and possibly setting some more parameters, then using delete from mailshot, finally making the address labels file.
You can also save the mailshot at any stage, and load it back in again at a later date to continue working on it. It is also useful to save completed mailshots, in case you have a query as to who was included on them.
An example of a simple mailshot would be to add to mailshot all those who stayed any time in the last 3 years, and all those who enquired this year but didn’t stay.
An example of a slightly complicated mailshot would be doing a mailshot for all those not booked yet this year. First add to the mailshot all those you need i.e. booked in previous years or just enquired, then delete from mailshot all those who have booked this year.
Making a mailshot
To make a new mailshot, follow these steps
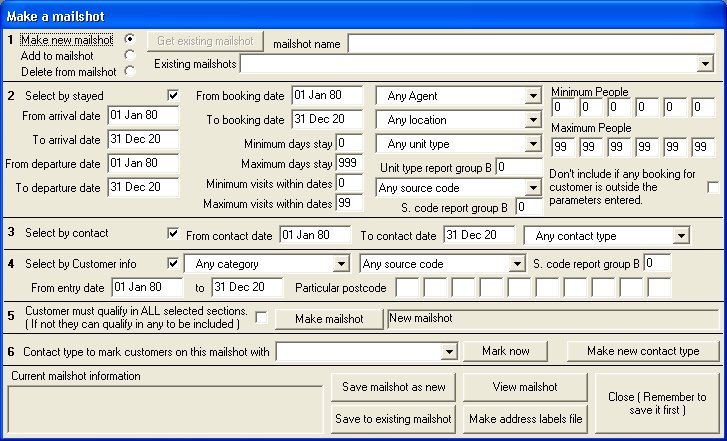
Select make new mailshot, section 1, if not already selected.
If you want to select customers by when they stayed, make sure there is a tick in section 2 Select by stayed. Then select the from arrival date and toarrival date you’d like, minimum and maximum nights etc in section 2.
The pulldown menus let you select more than one thing at once, each time you click the down arrow, and select an entry, it will be marked with a #, and the total number of selected entries shown.
Normally, if you pick dates for 2004 for instance, and some customers have also stayed in 2003 or 2005, or other years, they will be included. The tickbox Don’t include if any booking for customer is outside the parameters entered is there to prevent this happening. For instance, if you wish to mailshot everyone who stayed last year, but then remove all those who stayed as Sun bookings only, and never came back as ordinary bookings, and never stayed previously, you will need this switch.
If you want to select customers who made an enquiry, but didn’t necessarily stay, make sure you have a tick in section 3. Set the dates, then select brochure request from the contact pulldown box.
If you want to select by when a customer was put on to the system, regardless of any stays or any bookings, make sure you have a tick in section 4. This section is used for selecting customers by their postcode or source code ( customer source code, not booking source code, that, you’ll find in section 2 )
Section 5 is where you’ll actually make the mailshot, or part of it. Note that the only selection in here is Customer must qualify in ALL selected sections. This is for doing things like mailshots to specific geographical areas. You’d set the parameters in section 2 or 3, set the postcode areas in section 4, then tick the box in section 5 before clicking Make mailshot. If you wanted to do a mailshot for stayed or enquired using Customer must qualify in ALL selected sections to get a certain postcode areas, you’ll have to do two passes, one for the stayed, tick in 2 and 4, and one for the enquired, tick in 3 and 4, otherwise you’ll only get customers who did both.
Once you’ve made the mailshot, you’ll notice that the selection Add to mailshot in section 1 has automatically changed, and that the information box in section 5 tells you how many you’ve selected so far. You can have as many passes as you like, selecting or deleting different things as you go before moving on to the bottom of the form.
At any point you can click view mailshot at the bottom of the form to see that you have what you intended. You can also re-start the entire process by selecting Make new mailshot as any time.
Once you are happy with the mailshot, you’ll need to make the address labels file. This is so you can then use Microsoft Word or similar to run a mailmerge.
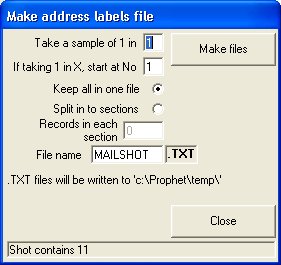
Click Make address labels file at the bottom of the mailshot screen
The other option you have at this point is to generate a sample of the mailshot you’ve just created. Samples are used to check the response you’ll get, as opposed to the response you got in any case from those you didn’t mailshot.
If you don’t want to take a sample, leave the inputs at 1 in 1, start at No. 1. The other option keep all on one file or split into sections is for large mailshots, those greater than 5000. Microsoft Word has trouble dealing with mailmerge files larger that this, so you have the choice to split up your mailshot in to sections, all given sequential names.
When you are happy with your selection, click OK. Once the files have been generated, see the information box at the bottom of this form, click Close to go back to the mailshot form.
To save a mailshot, first give it a name, be quite specific, as this will help you if you need to return to it at some later date. Type the name in to the Mailshot name input at the top of the screen, then click Save mailshot as new. The system will confirm what you are about to do.
Alternatively, you may wish to save a mailshot on top of an existing one. To do this, select the existing mailshot from the pulldown box Existing mailshots, then click Save to existing mailshot. This will completely replace the existing one. You’d use this when you are making up a complicated mailshot, and want to save progress so far in case you then make a mistake.
Once the mailshot is completed, you can then choose to mark all the customers who are on it. This will not only show on the customer information screen, but you can then track the mailshots response via Brochure request versus booking by source code on the reports and mailshot menu.
To mark all customers on the mailshot, first make sure it is loaded, or do this after you’ve just finished making the address labels file. In section 6 contact type to mark customers on this mailshot with, select on mailshot, or create your own specific mailshot marker using Make new contact type. Then click Mark now.