The starting point for bookings, brochure requests, accounts and till transactions, is find a customer, click Find customer or booking information on the main menu. You’ll get this form.
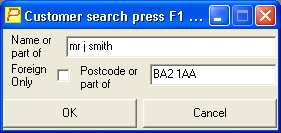
Type in the full name you are looking for, the system will filter out the surname part of it. Then press ENTER, or TAB, or click the mouse button on postcode. Next enter the postcode, or as much as the customer knows. Then press ENTER, or TAB to get you to the OK button, press ENTER again, or click Ok with the mouse button.
If you don’t have a Mr Smith from Bath in your database, you’ll get the following box.
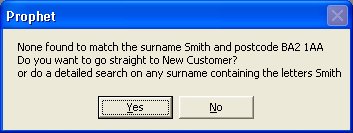
This offers you the choice to go straight to the new customer form, or look for the word ‘smith’ in a longer surname, but with the same postcode.
99 times out of 100 you’ll want to go straight to new customer, so press ENTER or click on the YES button with the mouse.
See page 9 for finding an existing customer.
The system is quite happy to look for ‘smi’ for instance, when you get the ‘none found’ box, click NO and it will search and find ‘Smith’, ‘Goldsmith’, ’Smithson’ etc. but only if they have the same postcode.
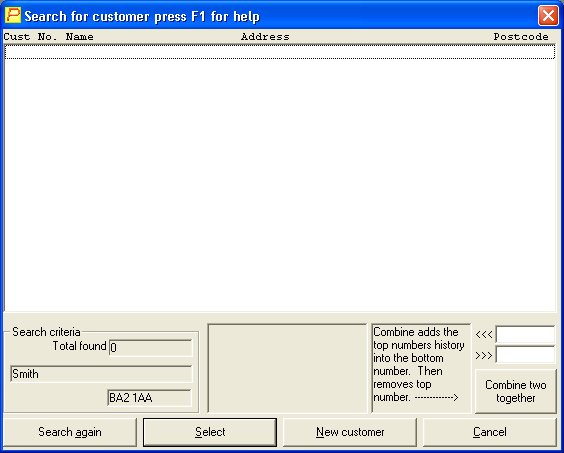
You can also just put in the postcode, and the system will find anyone you’ve got with that code. You can also just put in the name, and the system will bring up all those with that name. Remember that for smith for instance, you’ll get rather a lot. For every 1000 names you’ve got, you’ll get approximately 12 Smiths !
The other tickbox on the customer search form is foreign only, this is used for finding anyone with a non UK address. Foreign addresses won’t have a postcode, so just searching by name will produce the undesirable results discussed above. However selecting foreign only, and putting in a surname gets a much more specific match if one exists.
After you’ve said yes to go to the new customer form, you’ll get a blank search results form. Press ENTER to go to the new customer form, or click on New customer.
The next form you’ll see is customer information.
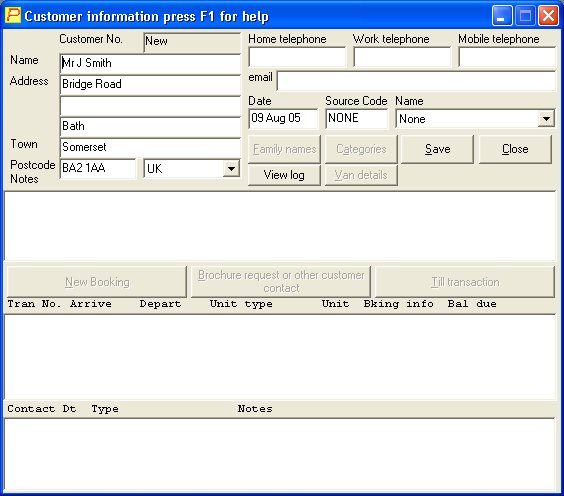
Note that the customer number at this stage is marked as ‘new’. Also, the new booking and other buttons are greyed out until you save these details.
Next you’ll need to press ENTER down to the first line of the address. The address information has been got from the postcode information you entered previously, but you’ll need to fill in the house number. Pressing ENTER through this form will take you through each input in turn. Note that the source code can be entered directly if you know it, or selected from the pulldown box.
Once you are happy with the information entered, you can click save. The form will look something like this.
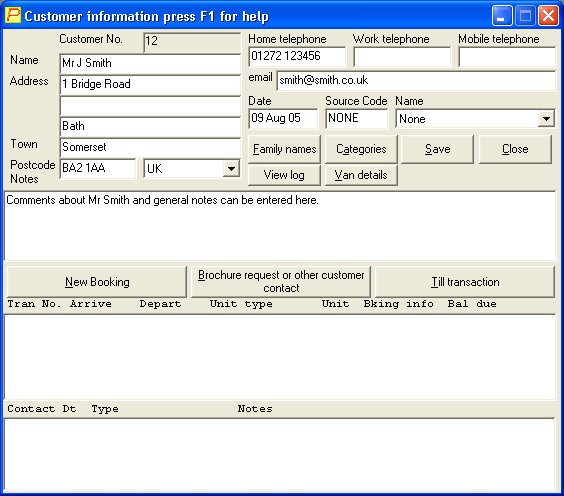
Note that we’ve now got a customer number, and that the new booking etc. buttons have lit up.
You can now do a brochure request, booking, or till transaction.
The next pages cover finding an existing customer.
If you’ve got Mr Smith in your database, you’ll see a form like this.
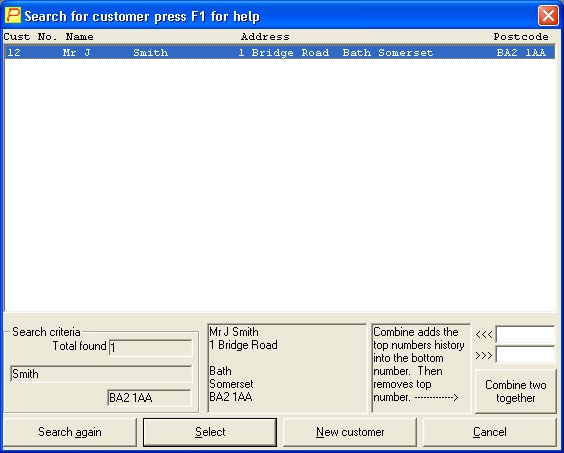
In this case, as you have only one match, confirm with Mr Smith that you’ve got the correct address, just in case two Mr Smiths live within the same postcode.
Then press ENTER, or click on Select, or click on the blue highlighted line with his name and address. This will take you to the customer details form.
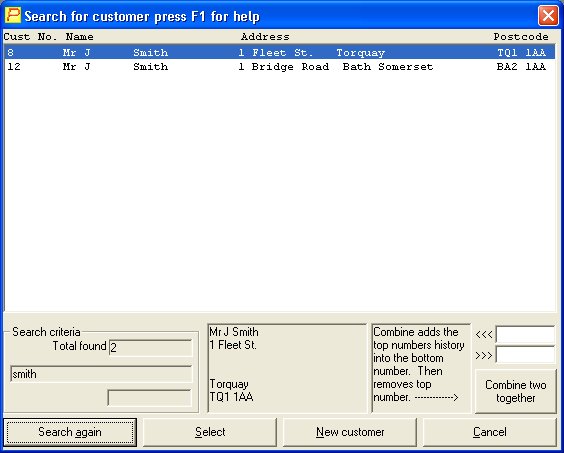
This form shows what happens if a search comes up with more than one result.
In this case, you can ask Mr Smith for the first line of his address. If one of the entries matches, click that one, if neither, then click New customer.
There is also a little section here called combine two customers’ history. This is for when you accidentally enter the same customer twice. You can click on each duplicate in turn, and then click combine two together and the system will take any history from the first, put it in the second one’s details, along with any history from that one leaving you with one entry containing all the details from both.