Once you’ve found or entered you customer’s details ( see page 7 ) you’ll see a button marked new booking on the customer information form. Click that to start a new booking.
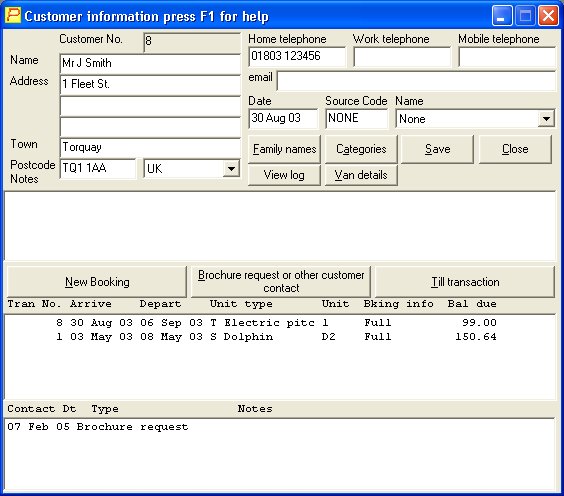
Alternatively you may want to amend a previous booking.
On the example here under the new booking button there are two bookings, the most recent is for August 2003 on an electric pitch. To amend this one click it once.
This form is for a booking. You can move through the booking by pressing ENTER and ESCAPE, you an also use the mouse to move to any part at any time.
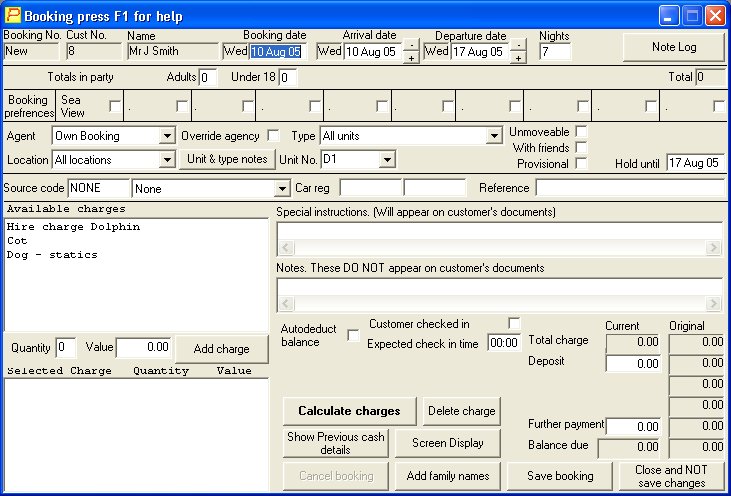
The inputs you will follow by pressing ENTER or TAB through the booking are detailed below in the order you will get them.
The starting point is the Booking date. This is the date the booking is taken. Next are Arrival date and Departure date. Alternatively you may enter theArrival date and skip to the number of Nights. Whichever method you use, the corresponding input is automatically set to agree.
Totals in party. In this example we’ve only got two categories showing, but you can have up to six.
Booking preferences. These can be set up to limit the units available in accordance with the customers’ preferences as to what type of accommodation or pitch they’d like, over and above the unit type.
Agency. Selecting a particular agency limits the units, depending on how they have seen set up.
Location is used for separating statics, lodges, touring pitches etc as well as actual park locations if you are using the system to book more that one park. As with the others, this limits the units shown as available.
Unit type, as its name suggests, if changed from all units will only let the unit No. show ones of the type selected.
Unit No. Once you’ve gone through all the previous sections inputs, the list of units available will only be ones that meet all the criteria above. If you know the unit you want to book you can just fill out arrival, departure, people, enter straight through, or click directly on to the unit No. and type it in!
N.B. At any stage, if the inputs before the unit number are changed, making that unit no longer available, the system will change it. You will be warned first ! Also if no units are available for the dates etc you’ve selected, then the unit No. input will be blank.
Unmovable. This marks the unit as one the customer specifically requested. Note that when selected by clicking on it, or by using the spacebar when it is highlighted, the inputs above it immediately grey out. This is to stop any accidental changing of the unit.
With friends. Similar to Unmovable, but you can select this one if the customer wishes to be near friends, relatives etc. You are still able to move this booking, but on the screen display it shows as a different colour.
Provisional. This is used to signify that a deposit has not been received yet. Normally provisional bookings are only kept for a certain period of time, and there is a report you can do to print out a list if those that should have paid by now, see bookings list in reports and mailshot.
Provisional hold date. This is automatically set to whatever you specify in global booking parameters, but you can change it. Provisional bookings are not automatically deleted, see above.
The advertising source code, you can either type straight in if you know it, or select it from the list.
You have space for two car registrations, if you don’t use the reference for anything, you can put more car registrations in there, as these will be included if you need to search for bookings by car registration.
Reference. If you take Hoseasons bookings or other agencies or travel agents, they will usually give you their own reference for the booking. This is where it goes.
Special instructions are where you can type in any requests the customer has for this booking, over and above the usual booking extras etc. What you type in here appears on the customers invoice.
Notes are as above, but for recording anything about this booking that you do not want to appear on the customers paperwork. It will appear on the arrivals, occupancy and departure printouts, if ‘show special instructions and notes’ is ticked.
If you’ve been pressing ENTER or TAB to move through the booking, the next thing you’ll be moved to is Calculate charges. This will automatically put the compulsory booking charges in to the selected charges box.
The lower left of the booking form is where the booking charges are entered. The lower box, titled selected charge is where all the charges picked for this booking are displayed. These are added together and the total shown in the lower right box marked total charge.
To pick an optional charge, or extra, select it from the list displayed above the selected charge box titled available charges. Click on the charge, then click Add charge, its value will be worked out automatically and added to the selected charge box, along with anything that was already in there.
To pick an optional charge, or extra, and change its value or quantity, click on the charge in available charges, then press TAB or click on the quantity input ( between available charges and selected charges ), change it, press TAB or click on the value input, change that, then click on Add charge.
To remove a charge, highlight it in the selected charges box, then click Delete charge.
Once you’ve finished with the charges, you can add any payment that the customer has made. To add a deposit, click on the input on the lower right titled Deposit. If this is a new booking, then the standard amount that is expected to be taken is automatically filled in for you. If you are taking a different sum, overtype this amount with the correct one. There is no need to include the decimal point or pennies if none are being taken, the system will automatically change the input to show these, when you move to something else. E.g. you can enter 30, and the system will change it to 30.00
The last thing to do is to save the booking, to do this click Save booking.
If you’ve entered any money, you will now get the payment form. This has the total amount taken displayed in the top left along with the payment date. The first input you click on defaults to the total payment, but you can change this if the payment is being made by more than one type at the same time. E.g. a touring booking, where you accept part as cash and part on a credit card. Once you are happy with the details, you can click OK. If you want to back out you can click Cancel, and the system will take you back to the booking form again.
N.B. You can back out of completing the booking at any time by clicking Close and NOT save changes on the booking form. This will abandon any changes you’ve made.
After you’ve saved the booking you can have the option to print an invoice. If switched on ( see switches ), it is a simple yes or no question. After this you are returned to the customer information form, to get back to the main menu, click the Close button, on the upper center right of the form.